Connect Cpanel Mail Id With Gmail Account
Everyone loves to use their company mail id like you@domain.com but login to webmail of Cpanel, every time for checking the emails, is a bit critical and time-consuming so today I am going to share the easiest way to manage your Cpanel or own domain mail from Gmail.If you are using Cpanel, then you can have your email id which can be used with your domain mail ids like admin@yourdomain.com or any other type of email id you want. There is no charge for connecting your email id and managing your emails both incoming and outgoing from Gmail. So let’s start the journey of learning, how to connect Cpanel Email Id with Gmail as one of the best email management app.
Step 1. Login to your Cpanel
Step 2. Go to Email Accounts by clicking on the highlighted Link as shown below
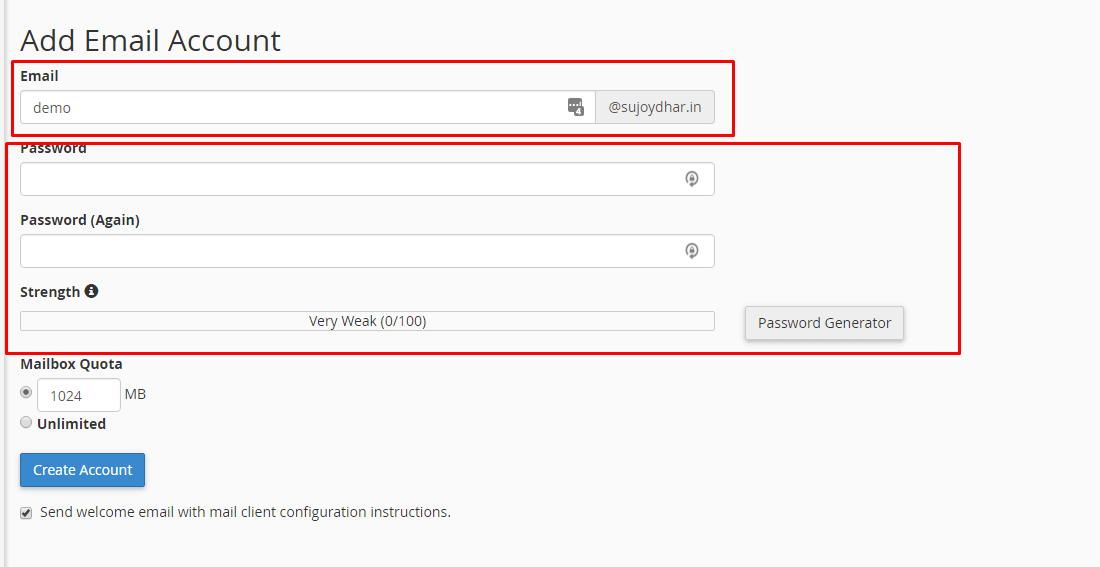
Step 3. Fill the details and choose your desired email id that you want to use
As for me, I have chosen ” Demo ” so my mail id will be created like demo@sujoydhar.in and then click on Password Generator and it will generate a random password and save it on a notepad as it will be required later.
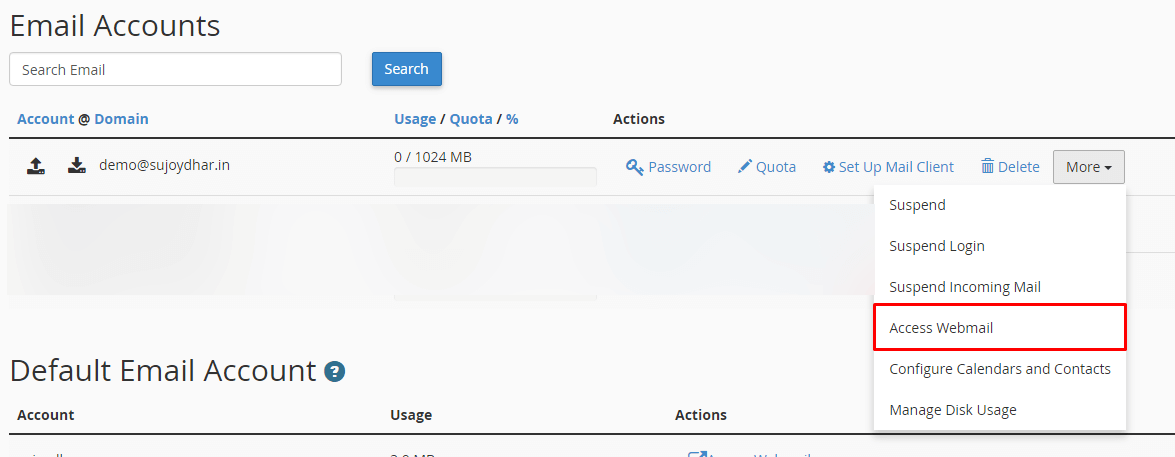
Step 4. After Creating the mail account click on the Access Webmail from the drop down menu as shown in the below image.
After you click on the Access Webmail it will open a new tab and then it will redirect you to the page where you need to choose the default app to manage your email Account and here I would recommend you to use Roundcube as the best and easiest way to manage emails though we do not need it after this setup. But we need to set the forwarder to receive the mail in our primary mail box. So proceeding further to the mail forwarding system.
Step 5. Look at the right and click on the email id from the top menu right and a drop down menu will open and from there click on the Forwarders Option as shown below:
As soon as you click on the Forwarders option, it will ask you to Add Forwarder so click on it and add your primary email ID ( i.e., myemailid@gmail.com ) where you want to receive the mails that are being sent to your currently made for your company mail id.Again click on the Add Forwarder after entering the email id.
Now you have completed the part of receiving or incoming mail to your Gmail Box; now we will move to the steps of sending the mail from Gmail, so we will log into gmail for managing our mails and sending the mails from Gmail.
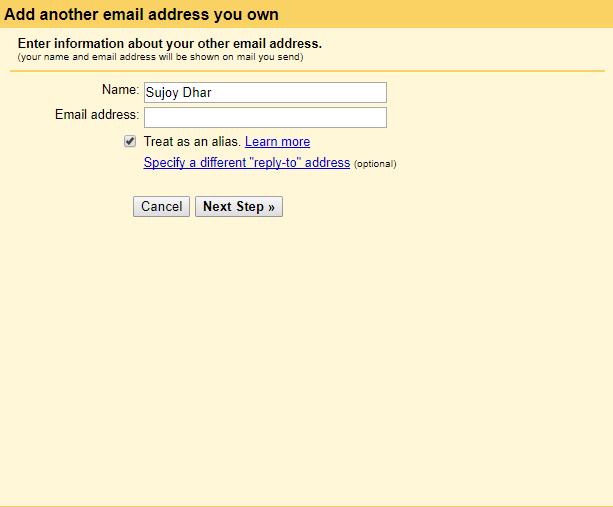
Step 6. After you logged into the Gmail look for the Gear button situated at the right corner up From the drop down menu choose Settings Option and then Click on the Accounts and Import Tab then find the option by scrolling down ” Add another email address ” so upon clicking on that button it will popup a new windows which will be similar to the given below image. So Add the email Address that you just created, i.e., you@yourdomain.com email ID.
Enter the Name that you want to show to your receiver and your email id from which the email will be sent.After you click on the next button, it will show you the next page where you need to put SMTP Server, Username, Password . I will break down them to explain in details.
SMTP Server: Your domain ( i.e., you@yourdomain.com your mail server like mail.yourdomain.com can be your mail server ) or Server Hostname ( i.e., your hosting company have a hostname or IP Address that you can find on your Cpanel URL https://123.45.678.9:2083 or https://server.hostname.com:2083 )
User name : Your newly created mail id will be your username
Password: The password that you created inside the Email Account section or the one I have asked you to copy in notepad.
After filling out the details Click on Next Button, and it will ask you for the Verify code which was sent to your Mail Box, so we need to open that mail and find the code that was sent by the Gmail to the newly created mail id.Do not Close the Window.
So go back to Webmail section, I repeat in short now. Cpanel > Email Accounts > More ( Drop Down Menu ) Access Webmail from Drop Down > Round Cube
You will get mail from Gmail with the subject as ” Gmail Confirmation – Send Mail as you@domain.com .”
Open that mail and find a code is being sent to you and you will find the code as Confirmation code: 123456789
So put that code in the pop-up menu box and you are done for sending and receiving the emails from Gmail. For test click on the Compose button from Gmail and find your email id from the option From.
So your Own Company or Domain Mail is being connected to Gmail and ready for the incoming and outgoing mail from gmail inbox, and you can manage the emails easily from Gmail without login to Cpanel Everytime.


