
SSL certificates play an essential role for any websites. Even there are so many reasons why your website should have an SSL certificate. Like it helps you trust Search engines as well as readers to trust your websites.
Even Google considers SSL certificates as one of the elements in their ranking algorithm. Moreover, after the Google Chrome’s recent July update, it is mandatory to have SSL certificates over your website, or else Google Chrome is going to mark your website as “unsafe”.

Not only that but it is well known that Google strongly prefers websites with https rather than nonencrypted http.
Just because of this kind of factors, it is mandatory for the webmasters to get an SSL for their website. And recently, a project named Let’s Encrypt funded by the biggest tech giants.
This helped so many webmasters to get a free authorized SSL certificate tackling the high prices of traditional SSL certificates.
As you already aware of the fact that SSL certificates can be pricey. Even there are different SSL certificates for different websites. Some of the SSL certificates are for an Ecommerce website. Some SSL certificates are available for organization websites and so on.
However as long as you are running a blog, then the Let’s Encrypt will do the job with ease. Plus you do not have to pay for it.
So just in case if you are wondering, how to install the certificate on VPS server. Then read on. As in this article, we will be talking about how we can install Let’s Encrypt SSL certificate on a VPS running Webmin or Virtualmin. So let’s just head into the topic without wasting much of the time.
However, before we do so, here are a couple of things to keep in mind:
What we are going to do is going to be considerably easy but at first, make sure to have a working VPS with Webmin/Virtualmin installed. you must have the access to Webmin/Virtualmin Admin Control Panel. Additionally, it is better to have an already hosted virtual server within it.
In this tutorial today, we are going to:
● Enable the SSL for our already created website.
● Install Let’s Encrypt SSL on the virtual server
Enable the SSL for the Website:
Step 1: The very first step towards enabling the SSL for our website is going to be logging in to the Admin panel of Webmin/Virtualmin. You can do that by going to https://1.2.2.1:10000 [Change the dummy IP address 1.2.2.1 with your dedicated VPS’s IP address]
Step 2: On the top-left side of the page choose “Virtualmin”

Step 3: Now, choose the Virtual Server which you want to install an SSL certificate at. Make sure to have a virtual server already set up and running.
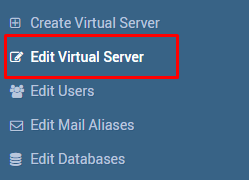
Step 4: Now find the “edit virtual server” on the left side menu and click on it.
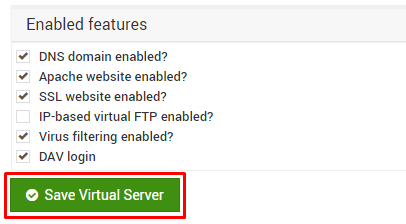
Step 5: Click on “Enable Features” option. Once clicked find the option “SSL Website Enabled?” and make sure that the option is ticked.

Step 6: Once checked and enabled, proceed to click “Save Virtual Server” to save changes.
Installing the let’s Encrypt SSL over the selected virtual server:
Step 1: Once SSL is enabled on your desired virtual server, we can keep continuing to Install the Let’s Encrypt SSL on our website.
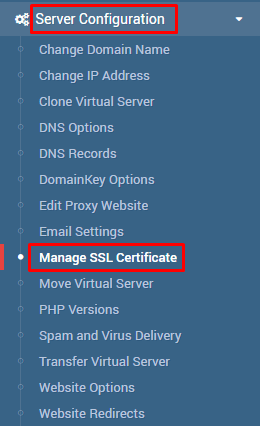
Step 2: Locate the tab with the name “Server Configuration” and click on it. Now, many options are going to come up, out of which you need to select the option “Manage SSL Certificate”.
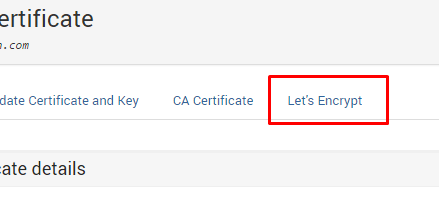
Step 3: Now, a page should open with the details regarding your current SSL certificate. Locate the navigation bar on that page and find “Let’s Encrypt”.
Step 4: This is now the most important step in the whole process. You need to check out the default setting and if they fit correctly according to your needs. If that is not the case, you need to change the settings.
- Coming to the first section “Request certificate for”, there are two available options to choose between. They are “Domains associated with this server” and “Domain names listed here”. If you want to install SSL over a particular Virtual Server which is also going to include all of its domains, then choose the “Domains associated with this server” option. Additionally, if you have added any subdomains after installing SSL for a particular Virtual host, then proceed with the “Domain names listed here”. By this option, you can install SSL over other domains and subdomains.
- The next section is the “Months between automatic renewal”, under which you are again going to get two options. One being “Only renew manually” and the other being a field where you can enter the number f months after which you want to renew the certificate. You can choose the latter option to renew your certificates automatically. It completely depends upon you keeping your own convenience in mind.
Step 5: Now, since you have selected the main options, it is now time to get the SSL certificates installed by clicking on the “Request Certificate”.
Step 6: If everything is done correctly, you should now receive a success message stating that the SSL s successfully installed.
Now, you should be able to visit your website over the HTTPS protocol. It is time to edit change all the links from http to https if you are hosting standalone website. On the other hand, WordPress makes the work a little easier for you.
You can also automatically redirect all of your traffic from http protocol to the https one using Let’s Encrypt tool. However, when using WordPress, it automatically does the job without any other step required to perform.
Final Words:
Now, you know how to install Let’s Encrypt SSL on VPS which is running Virtualmin/Webmin. Hopefully, now you can encrypt all of your websites with much ease. Rather than that, it is now very much mandatory to have an SSL certificate on all of the websites and helping with the fact, Let’s Encrypt is a great choice and can be used by anyone with just a little technical knowledge or absolutely no technical knowledge.